Databases
Kuploy provides managed databases that are easy to set up and automatically backed up. All databases run within your project's private network for security.
Supported Databases
| Database | Use Case | Default Port |
|---|---|---|
| PostgreSQL | Relational data, complex queries, ACID compliance | 5432 |
| MySQL | Web applications, read-heavy workloads | 3306 |
| MariaDB | MySQL-compatible, enhanced performance | 3306 |
| MongoDB | Document storage, flexible schemas | 27017 |
| Redis | Caching, sessions, real-time data | 6379 |
Creating a Database
- Navigate to your project
- Click Add Resource → Database
- Select your database type
- Configure settings:
- Name: A unique identifier
- Version: Database version (latest stable recommended)
- Size: CPU and memory allocation
- Click Create
The database is provisioned within minutes.
Database Sizing
| Size | CPU | Memory | Storage | Use Case |
|---|---|---|---|---|
| Starter | 0.5 vCPU | 512 MB | 5 GB | Development, small apps |
| Standard | 1 vCPU | 2 GB | 20 GB | Production workloads |
| Pro | 2 vCPU | 8 GB | 100 GB | High-traffic applications |
| Enterprise | 4 vCPU | 32 GB | 500 GB | Large-scale production |
Internal Connection Strings
Databases are accessible within your project's private network using the database's app name as the hostname — a Kubernetes Service in your project's namespace. It resolves only from within the cluster (from your other services in the same project), never publicly. You'll find the exact connection string on the database's General tab.
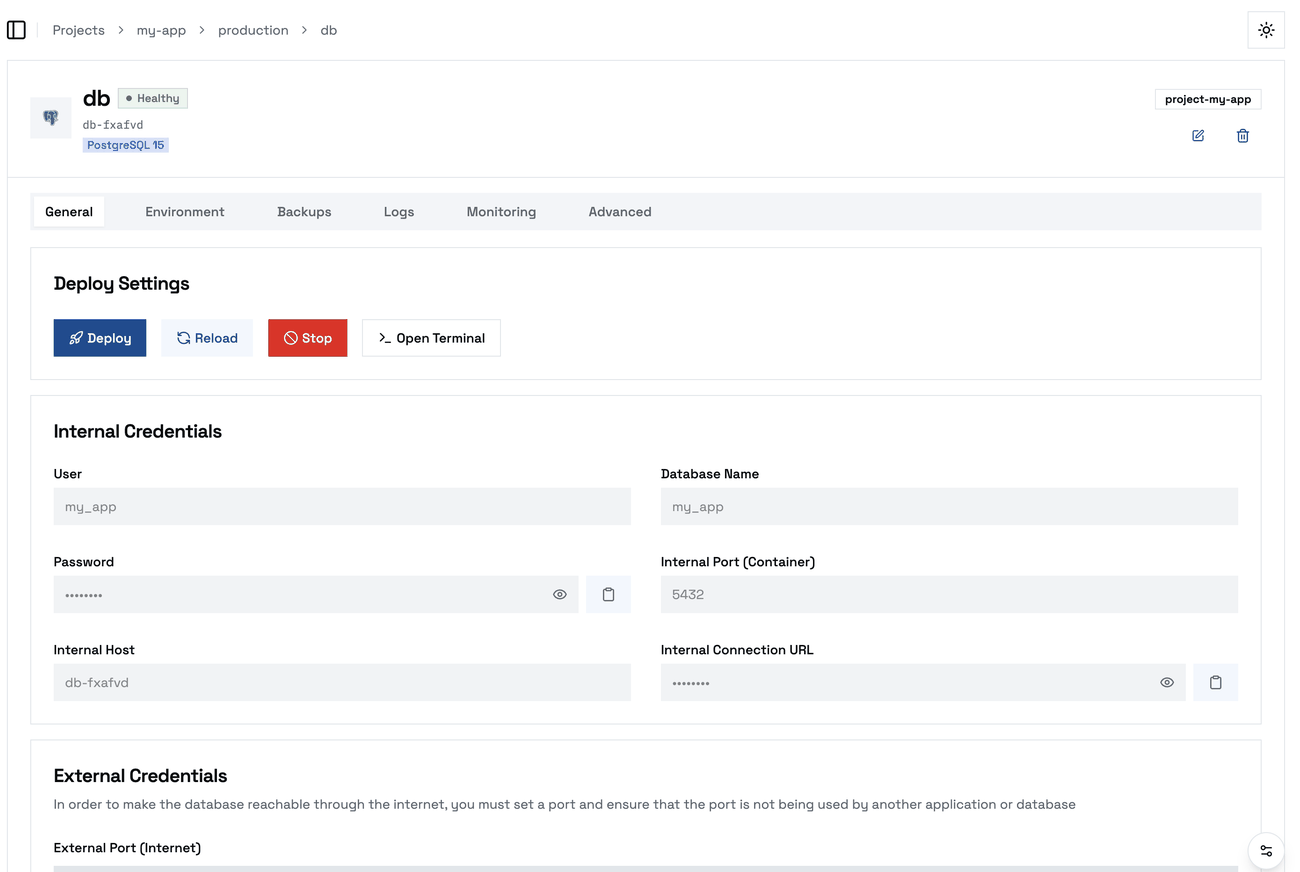
PostgreSQL
# Connection string format
postgresql://[user]:[password]@[host]:5432/[database]

# Example
postgresql://kuploy:abc123xyz@pg-mydb:5432/app_production

# Individual components
POSTGRES_HOST=pg-mydb
POSTGRES_PORT=5432
POSTGRES_USER=kuploy
POSTGRES_PASSWORD=abc123xyz
POSTGRES_DATABASE=app_production
MySQL
# Connection string format
mysql://[user]:[password]@[host]:3306/[database]

# Example
mysql://kuploy:abc123xyz@mysql-mydb:3306/app_production

# Individual components
MYSQL_HOST=mysql-mydb
MYSQL_PORT=3306
MYSQL_USER=kuploy
MYSQL_PASSWORD=abc123xyz
MYSQL_DATABASE=app_production
MariaDB
# Connection string format
mysql://[user]:[password]@[host]:3306/[database]

# Example
mysql://kuploy:abc123xyz@mariadb-mydb:3306/app_production

# Uses same format as MySQL
MYSQL_HOST=mariadb-mydb
MYSQL_PORT=3306
MongoDB
# Connection string format
mongodb://[user]:[password]@[host]:27017/[database]

# Example
mongodb://kuploy:abc123xyz@mongo-mydb:27017/app_production

# With auth database
mongodb://kuploy:abc123xyz@mongo-mydb:27017/app_production?authSource=admin

# Individual components
MONGO_HOST=mongo-mydb
MONGO_PORT=27017
MONGO_USER=kuploy
MONGO_PASSWORD=abc123xyz
MONGO_DATABASE=app_production
Redis
# Connection string format
redis://:[password]@[host]:6379

# Example
redis://:abc123xyz@redis-mydb:6379

# Individual components
REDIS_HOST=redis-mydb
REDIS_PORT=6379
REDIS_PASSWORD=abc123xyz
Use the Link Resource feature in your application's Environment tab to automatically inject these connection strings. See Linking Databases.
Connection Pooling
For production workloads, use connection pooling to reduce database connection overhead:
PostgreSQL with PgBouncer
If your platform provides PgBouncer, connect through the pooler endpoint instead of directly to PostgreSQL. The pooler hostname follows the pattern:
# Pooled connection (recommended for production)
DATABASE_URL=postgresql://kuploy:password@pgbouncer-mydb:5432/app_production

# Direct connection (for migrations, admin tasks)
DATABASE_URL=postgresql://kuploy:password@pg-mydb:5432/app_production
Application-Level Pooling
Most ORMs support connection pooling. Configure pool size based on your plan's resources:
# Example: set pool size via env var
DATABASE_POOL_SIZE=10
Backups
On Kuploy Cloud your managed databases are backed up automatically. Every database gets a daily backup when it is created — you do not switch anything on, and there is nothing to configure before your data is protected.
| When | Once a night, between 02:00 and 06:00 UTC. Each database is given its own minute in that window. |
| What is kept | The 7 most recent backups. Older ones are removed automatically. |
| Where | Encrypted platform backup storage, managed by your provider. |
| Cost | Included. |
Automatic backups are a Kuploy Cloud feature. On a self-hosted instance you configure your own schedule and S3 destination, as described under Your own backup storage below.
Seeing your backups
Open your database → Backups tab. Backups your provider manages for you are listed with a Managed by your provider badge. You cannot edit or delete that entry — it belongs to whoever owns the storage — but two buttons on it are yours:
| ▶ Run Manual Backup | Takes an extra backup right now, on top of the nightly one. Use it before a risky migration or a big delete. |
| 🕘 History | Every run of that backup and whether it succeeded. |
A new database shows its schedule straight away; the first backup appears after that night's run.
The card does not change after you press ▶ — the run is recorded under History, not on the card itself. Open History to confirm it succeeded.
Running a manual backup adds a copy, it never replaces one: press it three times and you get three separate backups, each from the moment you pressed it. They count towards the number of copies kept, so the oldest is removed once you are over the limit.
What these backups are — and are not
Nightly backups are dumps: a complete copy of the database as it was when the backup ran. Restoring one returns your data to that point, so you can lose up to a day of writes.
They are not point-in-time recovery. If you need to restore to an exact moment — "just before the bad migration at 14:32" — a nightly dump cannot do that. Talk to your provider about what is available for your plan.
Restoring
Your provider can always restore a platform-managed backup for you, on any plan. Tell them which database and which date you want restored. Nothing about your plan can make your data unrecoverable.
Some plans also include self-service restore, which lets you do it yourself without waiting. If yours does, open Backups in the sidebar, pick a database, choose a backup and give the restored copy a name. If it doesn't, the page says so and asking your provider stays free.
Restoring never overwrites the database you already have. It creates a new one from the backup, so you can check the data before switching your app over — and if the backup wasn't what you expected, you have lost nothing.
Because it creates a database, a restore needs room in your plan. If you are at your database limit, delete one you no longer need, or ask your provider — they can restore for you regardless of your limit.
Two places say "Restore" — they do different things
This catches people out, so it is worth thirty seconds before you click.
| Where you are | What "Restore" does |
|---|---|
| Backups in the sidebar | Creates a new database from the backup. Your existing one is untouched. |
| A database → Backups tab → Restore Backup | Writes into the database you are looking at, replacing what is in it. |
The sidebar page is the safe one, and the one to use if you are not certain. The database-level dialog is for deliberately rolling a database back to an earlier state — useful, but it overwrites, so be sure the backup is the one you want before confirming.
If a restore goes wrong, your backups are still there: restoring never deletes or alters them.
If you have configured your own backup storage, you can restore those backups yourself from the Backups tab at any time, whatever your plan.
Platform-managed restores always create a new database for you. Restoring from your own storage does not: it can write straight into an existing database and overwrite everything in it. Prefer restoring into a new database and switching your app over once you have checked the data.
Changing the schedule or turning it off
Your provider owns the default schedule, so it is read-only for you. To change its timing or retention, or to stop it, ask them.
Backup entries you create yourself — against your own storage — you can edit freely:
- Change the time or frequency — edit the cron expression.
- Keep more or fewer copies — change the retention count.
- Turn it off — disable the entry.
Disabling a backup means your database is no longer backed up. Your provider can see that you opted out and will not treat it as a fault, so nothing will warn you about it later.
Your own backup storage
You can send backups to storage you control, in addition to (or instead of) the platform's. This also unlocks self-service restore.
- Go to Settings → Destinations and click Add Destination
- Enter your credentials:
- Endpoint — your provider's S3 endpoint
- Bucket, Region, Access Key ID, Secret Access Key
- Click Test Connection, then Save
- In your database's Backups tab, create a backup entry pointing at it
Works with any S3-compatible provider — Amazon S3, Cloudflare R2, DigitalOcean Spaces, Backblaze B2, Wasabi, MinIO.
Manual backups
To take a backup right now — before a risky migration, say — open the Backups tab and click Manual Backup on the entry you want to run. It uses that entry's destination and retention.
Database Management
Accessing the Database Console
For direct database access:
- Go to your database
- Click Console
- Use the web-based terminal
Or connect via your application using the connection string.
Scaling Your Database
To resize your database:
- Go to Settings → Resources
- Select a new size
- Click Apply
Scaling requires a brief restart. Plan for a few minutes of downtime.
Database Logs
View database logs in real-time:
- Go to your database
- Click Logs
- Filter by severity or search for specific entries
Security
Network Isolation
Databases are only accessible from within your project's private network. External connections are blocked by default.
Enabling External Access
For development or migration purposes:
- Go to Settings → Network
- Enable Public Access
- Whitelist specific IP addresses
- Use the external connection string provided
Only enable public access when necessary. Always use IP whitelisting.
Credential Rotation
Rotate database credentials periodically:
- Go to Settings → Credentials
- Click Rotate Password
- Update your application's environment variables
- Redeploy your application
Best Practices
- Use connection pooling - Reduce connection overhead with tools like PgBouncer
- Enable scheduled backups - Never rely solely on manual backups
- Monitor performance - Check metrics regularly for slow queries
- Size appropriately - Start small and scale as needed
- Use internal networking - Avoid public access in production
- Rotate credentials - Update passwords regularly
- Test restores - Periodically verify your backups work